Computer Technology in Art Education
The course Computer Technology in Art Education includes readings, independant projects, and a researched presentation on the subject of computer technology. One such project was the creation of this portfolio-website. From these, the implementation of these into art education is discussed, including lesson plans. The artwork and writings I have produced in this course can be seen below. They are distinguished by type, and are accessible in the Table of Contents below.
Table of Contents
- Reading Doodles + Blurbs
- Three Unit Maker Projects + Mini-LPs (Make a Things)
- New Media Artists Presentation
- Final Lesson/Unit Plan
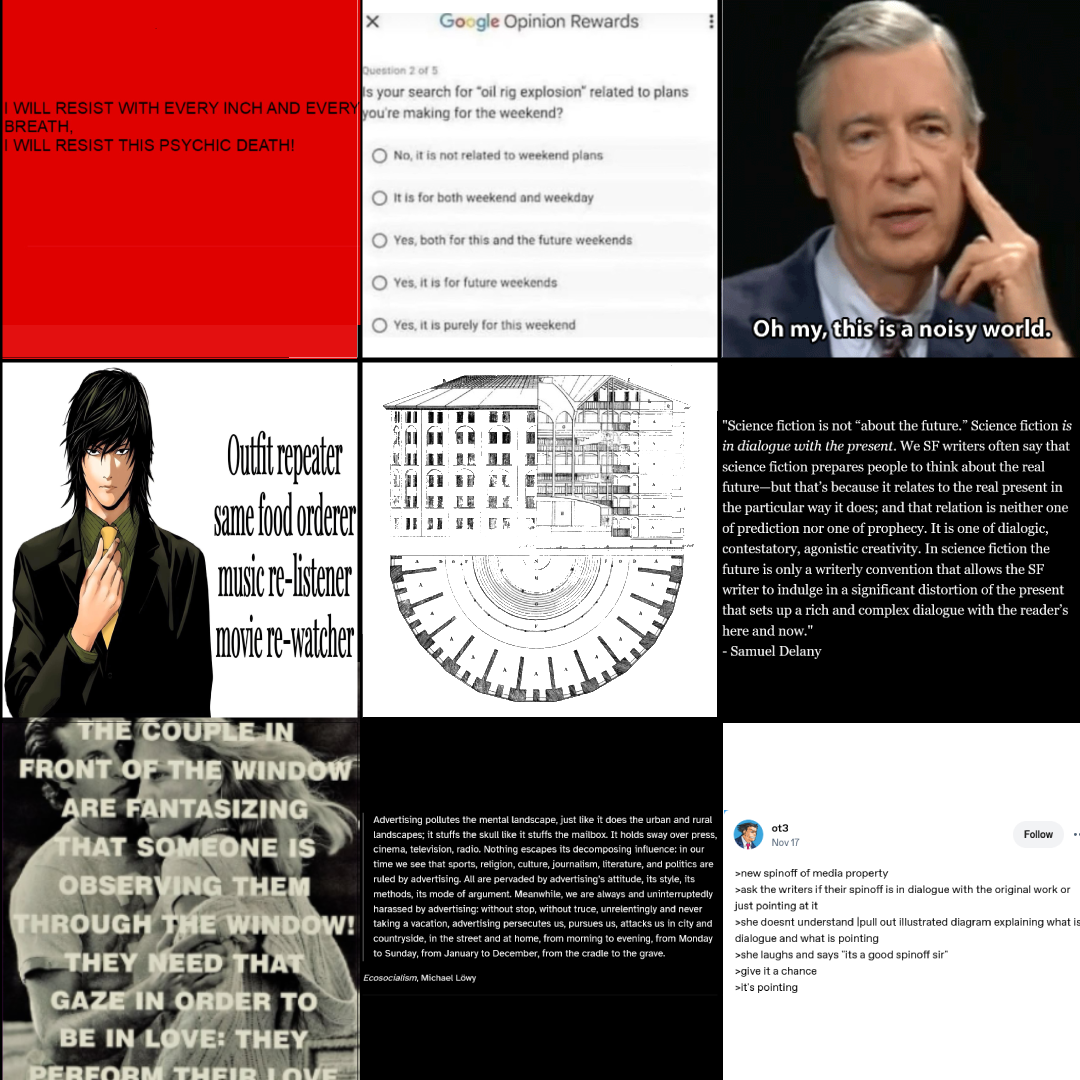
Reading Doodles + Blurbs
The following "doodle" artworks were made in response to readings for class. Read my reasoning for these creations and my reactions to the readings below.
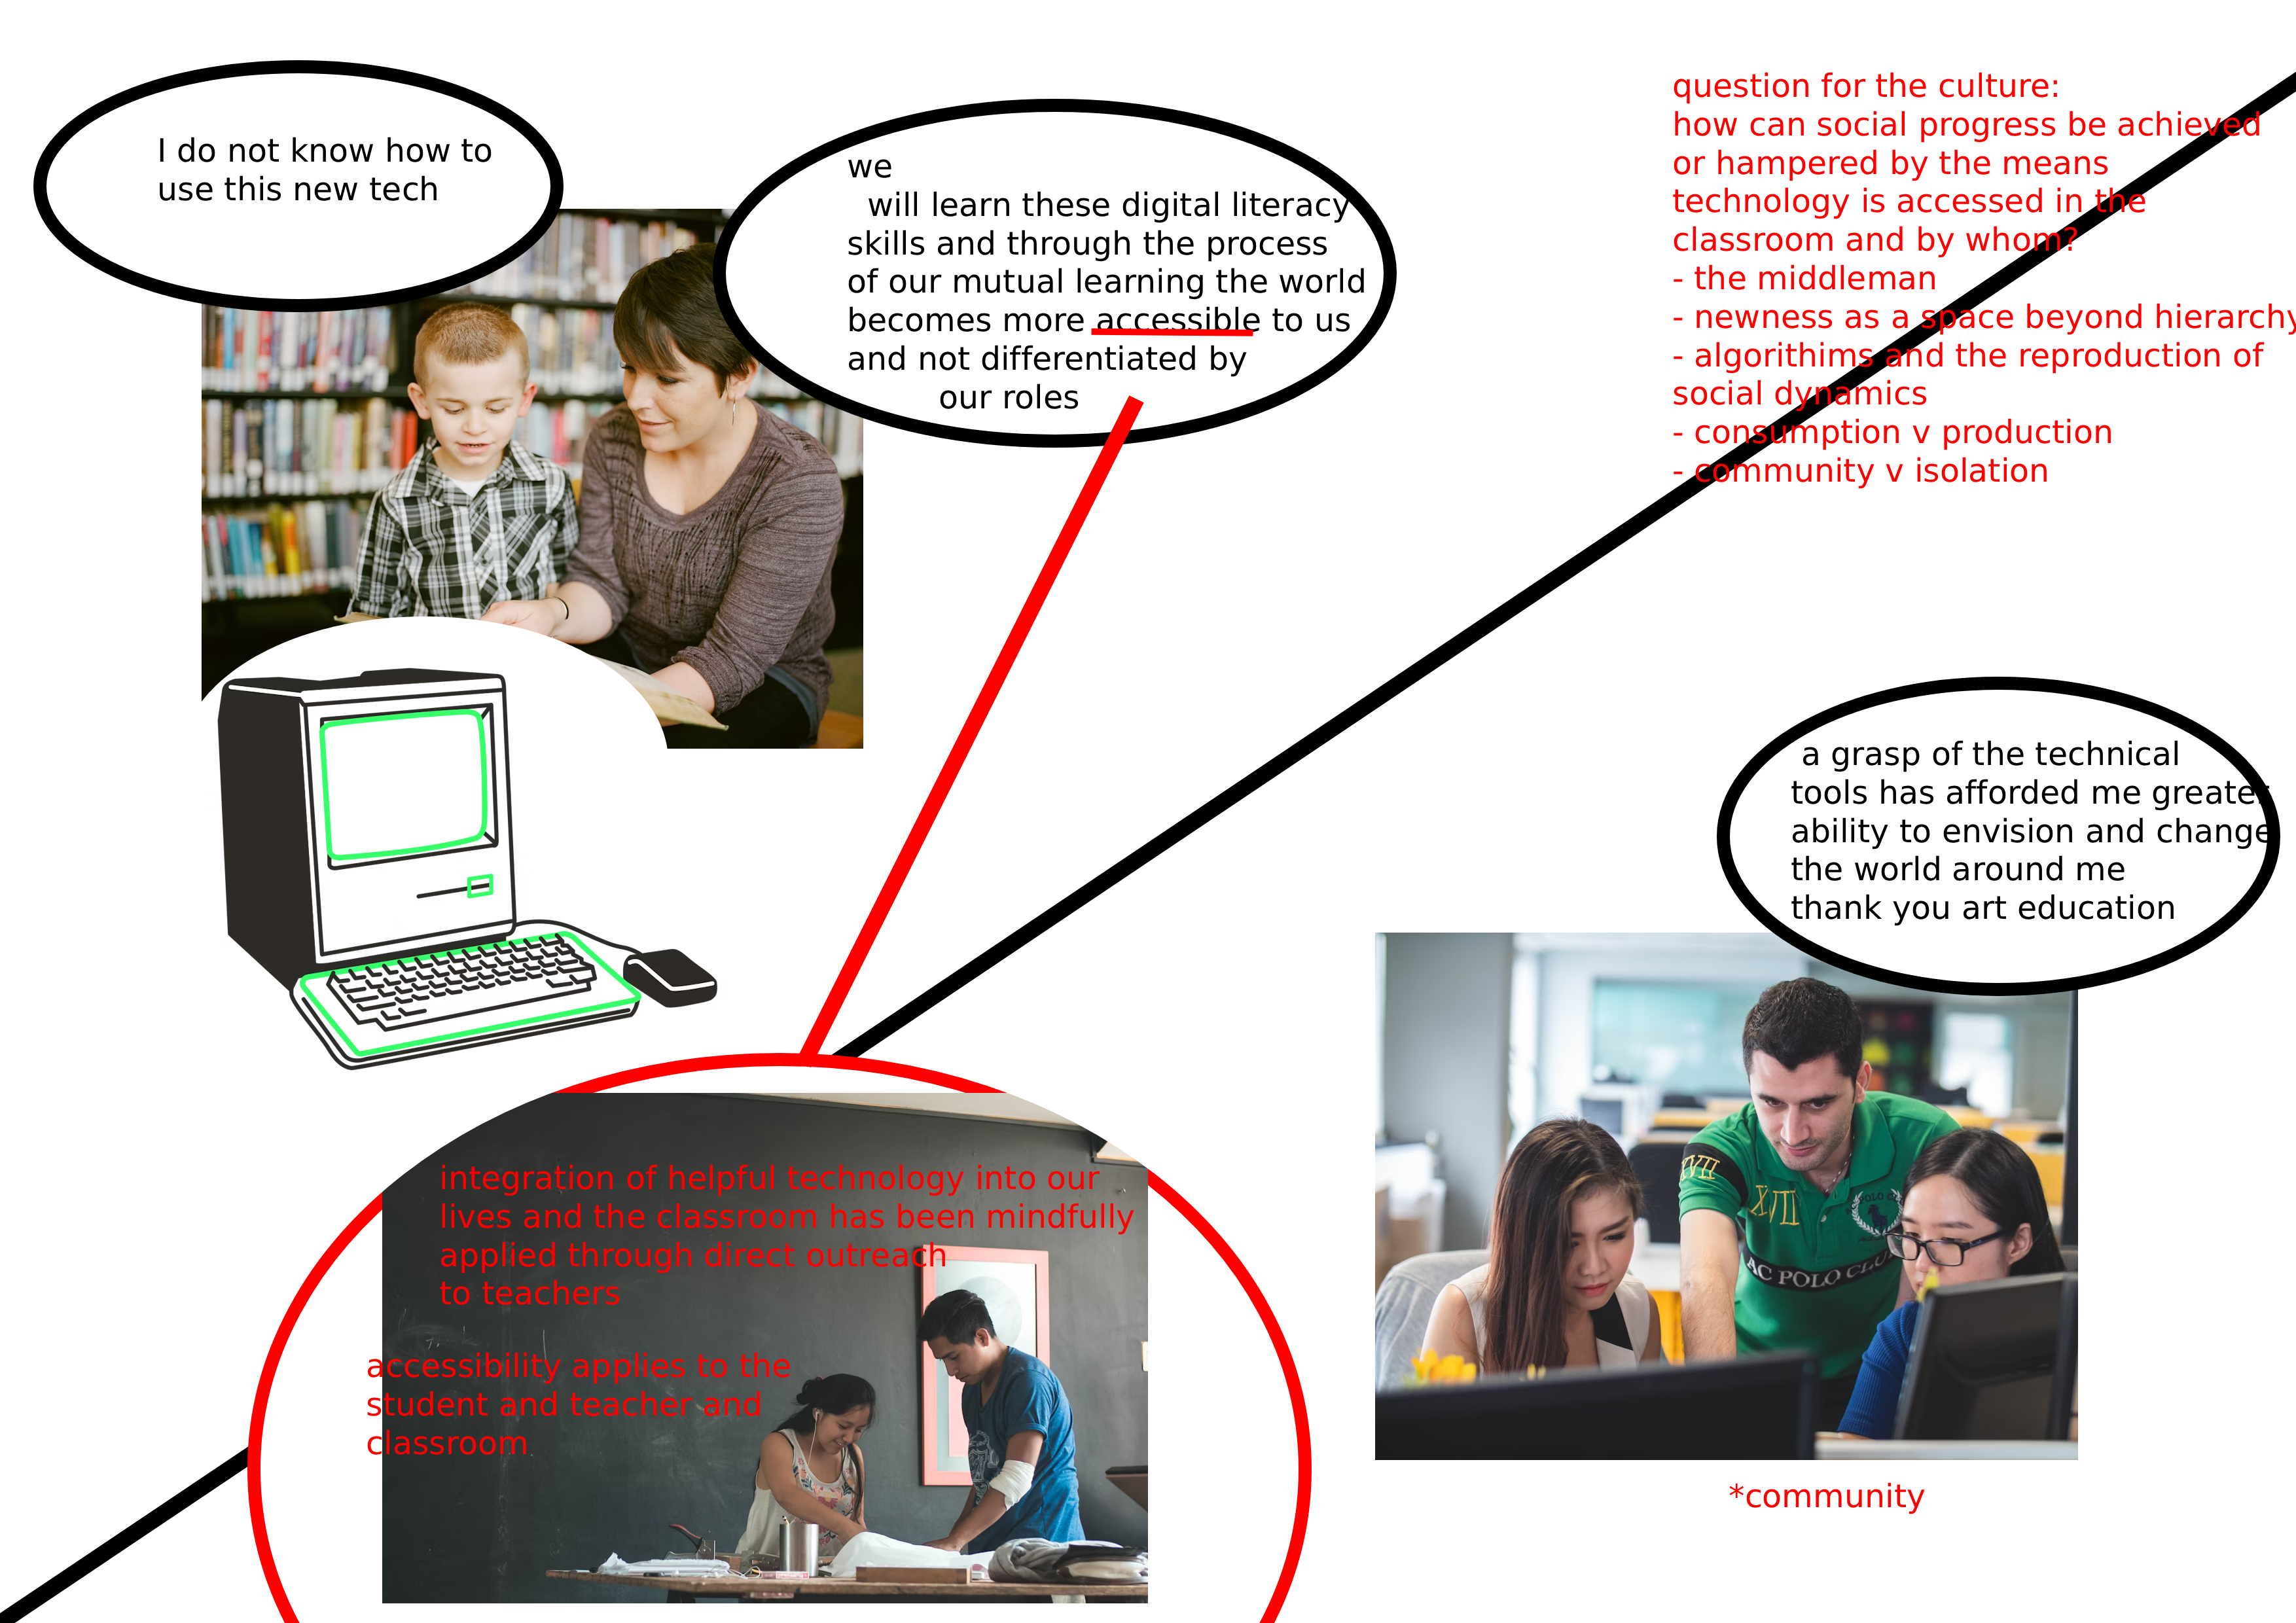
RE: "Rabbit Hole - Wonderland" and "Art Ed Radio Podcast #469"
Using photopea and stock images found on unsplash I sought to model my thoughts about the future social and individual possibilities of integrating tech. Something I found poignant (and connected to what we are discussing in ARTE 310) was students and teachers learning alongside each other: "newness as pedagogy". In addition, the social (isolation, polarization, consumption) implications of the internet and algorithms as seen on wonderland episode one also intrigued me.

RE: "Rabbit Hole - Looking Down" and "Mirror Image" (E 2 + 3)
After watching the two Rabbit Hole I was thinking about how in instances where people on the internet propagandize people to their side, they appeal to the aesthetics and dialogue styles of the audience's previous belief systems.

RE: "Histories of the Digital Now" by Christiane Paul + "Critically Reframing Post-Internet Art" by Timothy J. Smith + Net Art Anthology
I created this image using Kleki as a callback to the 1929 painting by René Magritte, The Treachery of Images known for it's witty caption "Ceci n'est pas une pipe" (this is not a pipe). The caption(s) of my drawing and Magritte's refer to the fact that this isn't a pipe, it is pixels on a screen or paint on a canvas. This is something both the modern art movement and net art movements touched on, an attention to the medium itself, with art as a vector to explore the characteristics of technology. I also was very moved by the mention that rule-based artmaking could be a form of play to benefit from. I found it fascinating.
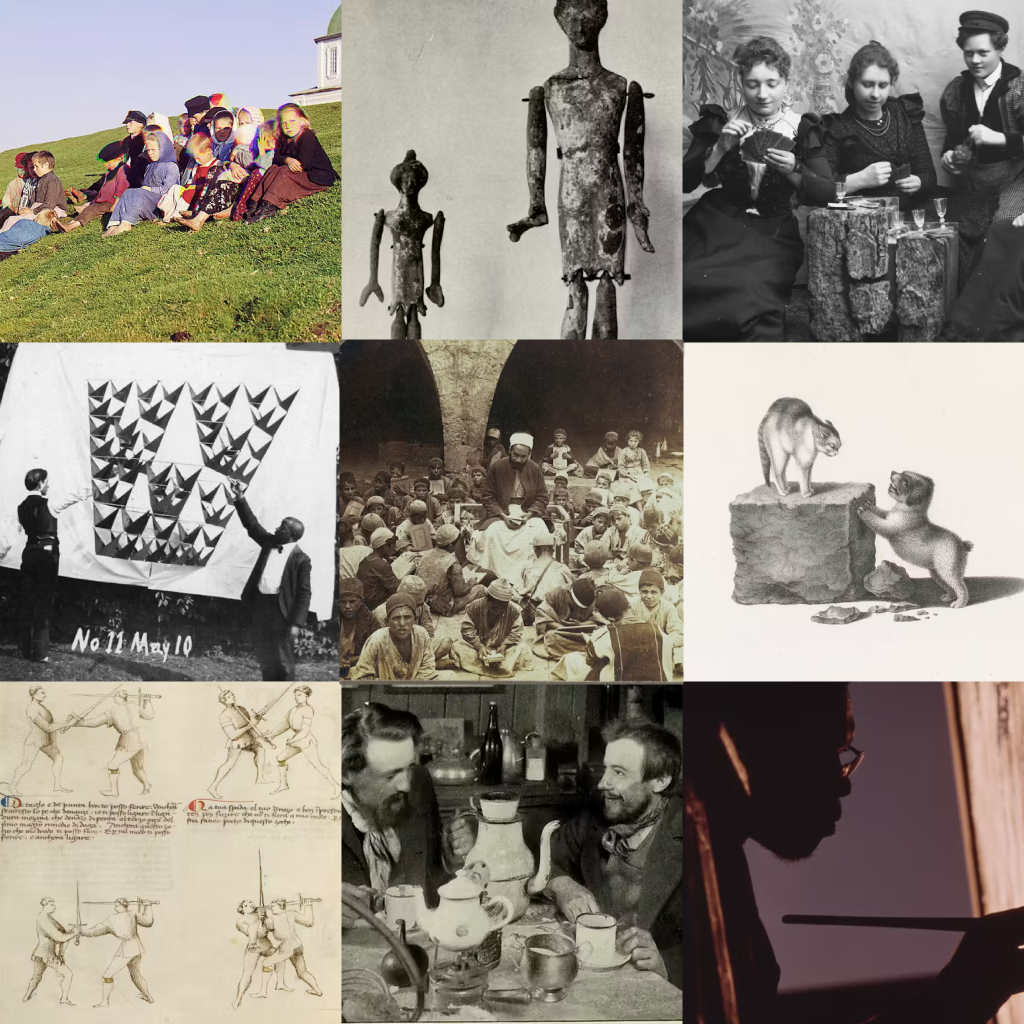
RE: "9 ways online teaching should be different" by Cult of Pedagogy + "Rabbit Hole - Headquarters" (E 4)
Using Photopea and images found on pdimagearchive.org (and wikimedia commons), I created a graphic where each square on the grid represents one of the distinct pillars of online teaching according to Melanie Kitchen. Because no image is one-to-one, this allowed me to think about what Kitchen was discussing on a deeper level when I was searching for images.
RE: "What the coronavirus reveals about the digital divide between schools and communities" by Nicol Turner Lee + "Program or be Programmed" by Douglass Rushkoff + "Have Smartphones Destroyed a Generation?" by Jean M. Twenge
Drawing with the touchpad on a computer is not easy. But this was a doodle I was thinking about after reading Lee's article on tech being used to teach in the absence of in-person schooling during the coronavirus pandemic. While some students do have those devices that keep them connected, not all homes are equally connected.
RE: "The Educational Implications of Godzilla, Ghosts, and Aliens" by Tricia Fuglestad
Reading this article made me think about how empowering it is for students to see their ideas manifested and transformed into reality because of their hard work. I think iPads or other accessible technology can be great vectors for that transformation.
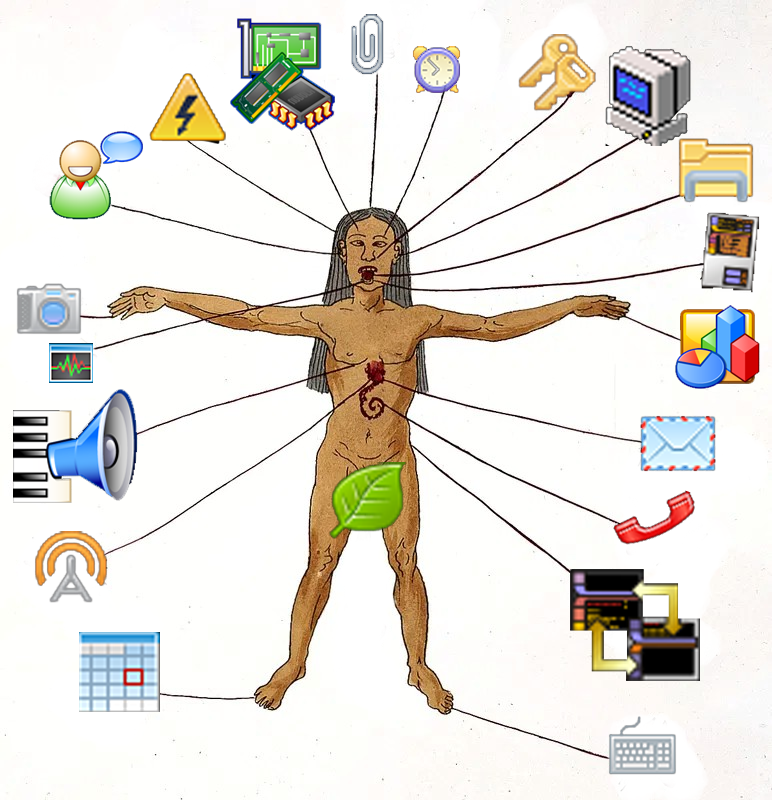
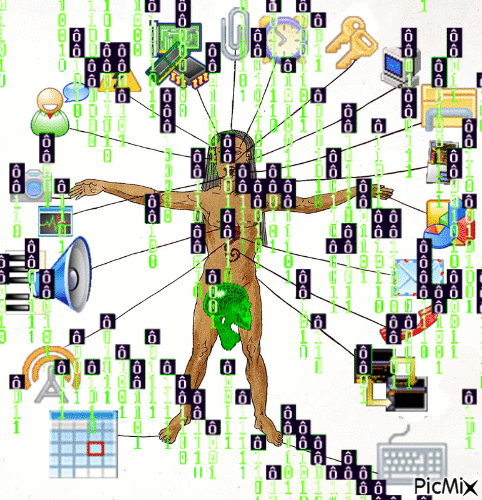
RE: "AI Art, Explained" from Vox + "AI Images" from Last Week Tonight + "This Is What Your Worlds Are Lacking: Artists Are Using AI To Create Fat, Black Sci-Fi And Fantasy Characters" by Cheyenne M. Davis + "System Error" by Luke Meeken
I was inspired by the concept of the general purpose user. A general purpose user is someone who uses computer technology applications in a way that may not be their express or intended use, but in a manner that completes the user's intention. I used these pixel art icons of various apps and an image I found on the public domain image archive of a Mesoamerican zodiac man to create a drawing of someone ostensibly connected to all these basic applications and computer uses.
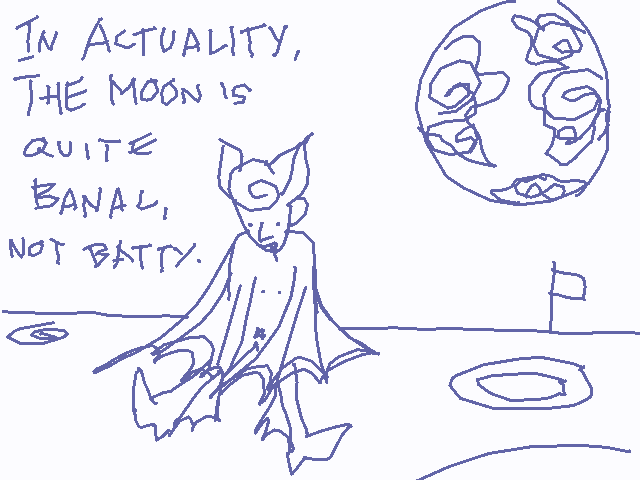
RE: "How Should I Be Using A.I. Right Now?" by Ezra Klein + "Watch - AI in Chinese education" from Wall Street Journal + "A.I. For Education Resources" + "The End of Privacy as We Know It" from the Newy York Times + "The Teen Mental Health Crisis" by Ezra Klein
For my doodle, I did a tiny rendition of the "Great Moon Hoax" which was one of the first incidences of misinformation. The story gained traction and believers because of its scientific packaging, but also, I think people wanted to believe in this fantastical tale. Cool or cathartic stories, even when pretty obviously false, are things you want to believe in. In my opinion, a large part of educating about misinformation is recognizing when you WANT to not/believe something.
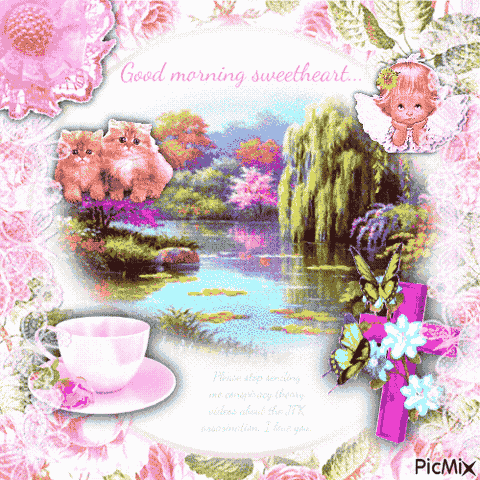
RE: "Misinformation" from Last Week Tonight with John Oliver + "Deep Fakes" module from MIT
I made this GIF using PicMix, which I also used for my make a moving thing. I used this site to make my doodle because it lends itself to the style of Whatsapp grannies/aunties who are going to be trying to send you fake news. But I changed the words usually associated with this kind of GIF or message to align themselves with anti-misinformation. But then again, some aspects of the JFK assassination cannot be easily explained by the fed's explanation!
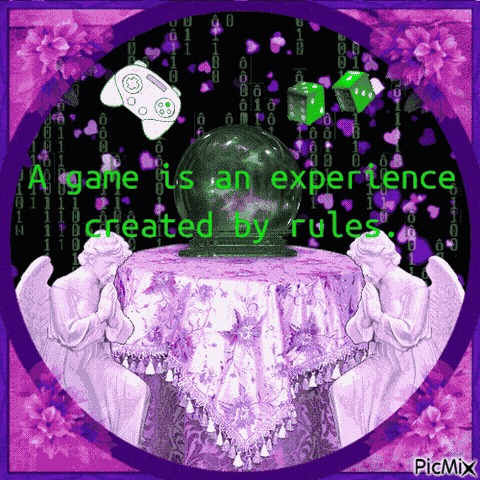
RE: "Rabbit Hole - Accidental Emperor" and "Impasse" (E 5 + 6) + "Making Sense of Cancel Culture" from On the Media + "Rise of the Videogame Zinesters" by Anna Anthropy
After reading "Rise of the Videogame Zinesters" I created this GIF because I was touched by this quote defining what a game is. It really tied into my make an image thing project from earlier this semester. I think that bringing the ideology of zines and indie/personal sharing of art projects into the digital scene is a great idea. I especially support this because I LOVE zines!

RE: "The Street Arcade: Creating Social Justice Videogames as a Platform for Community Dialogue" by Steve Ciampaglia + Kerry Richardson On the Media + "AI Pedagogy Project" from Harvard
For my doodle/blurb, I used Piksel to connect to a quote that really inspired me from The Street Arcade. Authors Steve Ciampaglia and Kerry Richardson expand on Paulo Freire's ideology on literacy, connecting it to technological literacy and coding with the statement "You need to be able to read the world in order to remake the world." This reminds me of a previous text in which young people's illiteracy with computer coding and modification was related to low innovation, exploitation, and low efficacy. I think by comprehending using technology, we can manufacture a society that fits our needs more accurately. If we hand off the making of our world to the already literate technocrats, we are rife to be exploited.

RE: "Forms and Bodies - Using Digital Fabrication" by Luke Meeken + "Everything is a Remix" by Kirby Ferguson
The history of sampling + remixing is an area of interest for me. I took some time to scroll through whosampled.com + was reminded of an artistic collaboration and sampling I admire. In Björk and Arca's Utopia, the artists chose birdsongs from both their native countries, Iceland and Venezuela. I think this shows how the choice of sampling can represent deeper creative thought and connection. After all, we are an amalgamation of everything we have seen/heard/felt/experienced. I used Piksel to depict an Icelandic bird, the gyrfalcon, with Björk + a Venezuelan bird, the Venezuelan troupial, with Arca.
RE: “Human Art Has So Much in Common With AI” Vivian Lam + "How I'm fighting bias in algorithms" by Joy Buolamwini
Inspired by webweaving (I had never heard it called that before!) I put together some of my thoughts on algorithms, surveillance, tech, and our current media landscape.
Three Unit Maker Projects
Make an Image Thing
This zine is a series of static images and text I created to be meaningful. I used Photoshop to arrange and create the pages of this project. I call this my "mini-digi-zine" and it is a collage of my own writings, other text, screenshots, and images on a subject I find meaningful: Star Trek and childhood. "Histories of the Digital Now" by Christiane Paul, a text read for this class, served as an inspiration for me.
A mini-digi-zine Collage of my own writings, other text, screenshots, and images on a subject I find meaningful: Star Trek and childhood Only 8 pages Only black and white (easier on printers) Only image and text I found online No drawings I made myself Use “textual evidence” supplemented by found images to write and make a statement about something you find meaningful. The finished project will be a miniature (8 page) digital zine. Familiarization with media, medium, and product. What is a zine? (The product). I would not assume every student knows what a zine is, so I would use a short period of time to review some examples of indie zines and encourage students to find zines that interest them and appeal to subjects they find meaningful. Using digital photo-editing software (the medium) to collage is also something that is new to many students; students may have familiarity with physical collage, and perhaps even some application of digital design because of Canva, Instagram, and Google Slides. However, I would not assume complete digital competency [read: I expand on this idea more fully in the accommodations section] and therefore would scaffold the introduction of the photo editing software using short demos (on the most necessary aspects of the software, i.e. file creation, saving, layers, and importing media) I screen-share before work time and follow-along-during-work-time demos. While students are working I would go around and assist if there are any technical difficulties. Synthesis of found images, one’s own writing, and found text (the media) is a major part of this project and thus I would not attempt it unless I was confident in students’ ability to seek out materials. This could be scaffolded by having an earlier, physical collage assignment, like a vision board. When introducing this assignment, after introducing what the finished product would look like, the class would (independently & collaboratively) find and contribute images of significance to them or are important to their idea. We did a version of this in our own ARTE250 class where we searched for images on the pdimagearchive.org site. Developing an idea. Not every student’s thought process will look the same. I understand that some students plan things methodically, some use a visual sketchbook, and other plans will be fully written; it is a spectrum. Because this project is geared towards the high school level, I would assume that students know that to explain their thoughts they use evidence. Planning includes applying & organizing textual evidence, one’s own writing and imagery and is linked to developing an idea. To add structure for the visual part of this I would introduce a table in the planning stage similar to one I used myself, with separate columns for “Concept”, “My textual analysis”, “Textual evidence”, “Imagery”, and page number. It is not necessary to use this table. However, to facilitate deeper thought and check-in that they are connecting with an idea that is meaningful to them, I would meet shortly with students to see what their ideas are after they have shared in mini-groups with their peers. Not every student feels confident enough to put forward their own ideas. Some themes that may be relevant to many students can be provided as an “inspirational list”, if they choose to seek them out. For example: beauty standards; music & subculture; culture & identity; history & social justice movements; friendship & peer relationships; family; social media; sports teams; personal hobbies; and stories. If a student has a favorite TV show, musician, or thing that they’re a fan of, creating a “fanzine” might be meaningful. Providing zines across a variety of subject matter is relevant to scaffolding the idea that students can produce art that is meaningful (to themselves, and others). Aspects of digital collage. A demo at the beginning of the lesson facilitates the introduction of digital collage techniques and concepts of the software program. Layers & clipping masks. I would say this is the main visual idea or collaging stuff together. Why are parts of the image in/visible or hidden? How can shapes and clipping masks be used to make cut-outs from images? Technical competency with the concept of layers and the effect should be scaffolded in the first demo run by the teacher and involve student participation and following-along. Transform tool. This is the second pillar of digital-zinemaking. How are images and text enlarged or shrunk? How can we position things on the page? Why can certain things be too large or small to be effective visually? How can the flip, rotate, and warp tools change the look of an image? Color editing & effects. There are endless possibilities when it comes to making images look different. Teachers should go over basic editing options and procedures (e.g. a color filter, pixellated effect) but students might have their own ideas of what they want to attempt and should thus explore the tools of the program themselves, look up tutorials, and ask for peer or teacher help. As expanded upon in the accommodations section, teachers should compile videos, tutorials, and demos for students to review if/when they would like. Just make sure students are appraised of the save and undo buttons so they do not lose progress and/or feel frustrated! Composition. Because a zine is about pages and will be read, students should be able to identify design principles informing the experience of the reader. For example, what part of the page is seen first? The center, the top? Where do our eyes go when reading a zine? Where should the most detail be located? Computer or device with Photopea, Photoshop, IbisPaintX, Paint [any photo editing software with features useful for collage, i.e. text, pasting and transforming photos] Sources for images that are vetted and appropriate: pdimagearchive.org, Unsplash, students pre-existing camera roll or assignments, scanned magazines/other physical media, or from a common class drive Non/technological ability to produce and edit text, for example with the Notepad app or Google Docs The planning stage might include physical media like a sketchbook, but also magazines or books to scan and use as media High school students, given the (possible) multi-day long research/planning as well as more formal collage styles. Specifically, grade 10, because these students are exposed to short essay writing (this is kind of a visual essay, or can be…) but not saturated with the subject. Also, I imagine a writing-heavy project could be boring for many students, and thus I emphasize, it doesn’t have to include much writing. Text can be anything [read: okay not anything, it must be school appropriate], or not be present. However, because students are creating by synthesizing, as opposed to making something new, I would not recommend this for a final project. If I were to attempt this project at lower grade levels, I would begin with a physical media component for the collage as to not overwhelm them with an entirely new medium (photo editing using tech) and encourage more poetic, simple, non-analytical type text produced by the students in order for the students to express themselves. This project could also entail interdisciplinary collaboration; in my case I touched on literary analysis, psychology, art history, and (technically) computers. If time constraints and student age dictate that class time not be spent in the “thinking” or “planning”, it might be beneficial for students to repurpose writing they’ve produced in other classes. The general theme at the high school level is using “textual evidence supplemented by found images to write and make a point about something you find meaningful”. Because I still want meaning to be a central idea, but think it should be less formalized for younger students, I would reissue the big idea to be more along the lines of “What means a lot to you? It can be an experience, idea, people, a place, or anything. Use found photos (NOT composed) and text to express how.” Large amounts of text might not be suitable for ESL students, those with dyslexia, or students with learning disabilities. Therefore, text is not intended to be a major part of the project; using it is a choice of the artist. The main idea should still be understanding and collaging various kinds of information and communicating one's own ideas; it is possible to do this using non-textual means. I encourage students to think about what they want to say and how they would like to do so. Students with physical disabilities might find it difficult to use certain handheld materials (e.g. scissors and razor blades to cut magazines) or maneuver a computer mouse/ handheld. From what I understand, disabled students are provided technological accommodations at the general school level (e.g. a special kind of mouse) so the latter is not an issue. Additionally, the former is not expected in this project. But it might be easier for students with a tool like a guillotine trimmer or special scissors. However, if motor skills are a roadblock at the computer, using a tablet may assist with ease of use. I anticipate that not every student will have the same level of technological competency and experience with whatever photo-editing software. Certain students may want to slow down with the instructions/demos or refer back to them during their process. I would plan to begin the class(es) with an in-person demonstration/follow-along of the photo-editing software features and general means of using it, but also record videos of this demo as well as specific common questions to avoid frustration. Because this is a very self-directed/individual project, I believe students could, if undergoing asynchronous learning, for example, set their own pace when making their mini-digi-zine and refer back to the videos or office hours if they ran into any questions. Also, this would mean students very invested in their vision would be able to dedicate more time to the project. Many of the sources I looked at for my project were geared towards educators. They include:Below, you can access the details of the lesson plan designed paralell to this image project.
THE INTRODUCTION
What I made:
Some restrictions I followed:
THE ACTUAL MINI-LP
Prompt:
Important skills and their scaffolding:
Considerations for materials:
Age/grade appropriateness:
Adjusting themes/big ideas for different age ranges:
Accommodations:
WHAT INSPIRED ME
Make a Moving Thing
This animation was created using the free website PicMix. This project was in response to the prompt interesting. It is a re-visitation of a previous doodle/blurb created for this class.
Below, you can access the details of the lesson plan designed paralell to this moving project.
THE INTRODUCTION
What I made:
I used the image from a previous doodle & blurb I thought was interesting and edited it using PicMix to make it move, adding GIF effects offered by the editing site. This could be considered to be in the blingee style.
THE ACTUAL MINI-LP
Objective:
The student will be able to make moving digital additions & changes to a past art product.
-
Identify previous themes or thinking behind the student’s previous artwork
-
Determine elements to change, modify, and expand on
-
Compare and contrast the old and new artwork
Big Idea:
Reinvention
Key Concepts:
Change, reflection, experimentation
Essential question:
How can reiterating something we have done before improve our thinking process?
Prompt:
Take a previous artwork from this class you have an interest in revisiting and use a GIF editing site like PicMix to create a loopable, “blingee-style” GIF incorporating the artwork.
Important skills and their scaffolding:
-
Selecting previous artworks & Identifying areas to explore & changes to make
-
While students work and before they begin editing, they will be thinking about what pieces from their previous artwork can be changed. To expose them to this kind of critical thinking, teachers can introduce artists that developed, edited, or collaged their previous artwork. Students are also encouraged to think about what previous artwork of theirs is interesting and explorable in greater detail.
-
-
Familiarization with what a blingee is
-
For some style reference and possible inspiration, teachers can show blingees in different styles. For example, there are blingees that are more neon, bright rainbow-colored, or intense, as well as others that are pastel, subdued, or gentle. Some include text, others don’t.
-
-
Understanding digital tools (some of this is copied from a previous LP because the image editors are similar)
-
On PicMix: THERE IS NO UNDO BUTTON NOR A SAVE BUTTON (until you’re done). APPRAISE STUDENTS OF THIS. Also, the GIF when being edited looks different to the exported GIF version because of how PicMix loads the GIFs that are a part of the main GIF.
-
“Stickers”
-
On PicMix, the site offers “stickers” under certain menus (which are in French but are pretty much mutually intelligible) or by searching. For example, I can search for “sunflower” and get transparent sunflower PNGs, sunflower GIFs, sunflower images, sunflower illustrations and sunflower cartoons which I can choose to add to my blingee.
-
-
Loopable GIFs
-
Students should understand what the GIF file format is, how it moves and how it is loopable.
-
-
Animation
-
On PicMix, images or GIFs can have “animations” added to them, which include movements like “blink”, “jelly”, or “breath”, etc. meaning this is one way students can add movement to their blingee.
-
-
Layers & “Masks
-
I would say this is the main visual idea or collaging stuff together. Why are parts of the image in/visible or hidden? How can shapes be used to make cut-outs from images? Technical competency with the concept of layers and the effect should be scaffolded by having a previous assignment using these digital image-editing tools. Specifically in PicMix, one can change the shape of an image to a shape like a square, circle, star or heart! These are called masks.
-
-
Transform tool
-
This is the second pillar of digital collage. How are images and text enlarged or shrunk? How can we position things on the screen? Why can certain things be too large or small to be effective visually?
-
-
Color, editing & effects
-
In PicMix, an image’s color can be changed using “Filters” or “Tint”, the latter of which is found under the image’s “Settings” tab. The settings tab also allows one to change the image’s transparency and add a drop shadow.
-
-
Considerations faor materials:
-
Computer (or iPad)
-
PicMix on browser, which has frames, stickers & editing tools to choose from
-
Additional images to edit from Google Drive or hard drive
Age/grade appropriateness:
I intend this lesson to be geared towards elementary schoolers (who are eight years old, give or take a couple years) at the end of the unit, perhaps as a fun reflective activity when pre-break jitters are high. Therefore, this activity would last half an hour. I think PicMix’s features are very intuitive and simple to grasp, especially if the student has used an in-browser program like Photopea or Kleki. Also, the images are attention-grabbing and fun, and engage with students ' desires to collage and decorate in bright, colorful ways. However, PicMix’s image editor might allow students to search for and find non-age appropriate content. While I haven’t found any technically inappropriate stickers in my use of the site, it’s still a possibility to be considered. What might actually make this activity not suitable for young children is the lack of an undo button.
Adjusting themes/big ideas for different age ranges:
-
Honestly, while stickers and bright images might be fun for elementary school students, I think this would be a fun activity for all ages. (Personally I make these in my free time…) Therefore, I wouldn’t change the site students use, nor the general idea of editing/collaging a blingee-style GIF.
-
I think keeping the topic focused on just editing a previous artwork (REINVENTION) is still a good idea for middle grade and high school students. However, at these ages, they might choose to diverge more from what they were initially thinking about the original artwork, which I would encourage.
-
However, older students not as interested in the editing process might speed through the activity. In general, I would not make this activity more than 30-45 minutes long for this age group for this reason. So older students don’t get bored and know they have options, I would show them various kinds of blingee edits. Older students might also choose to make an “ironic” blingee image (think Whatsapp grandmacore).
Accommodations:
-
PicMix does have stickers (and the option to edit images in a way) which could induce epilepsy because they flash or blink rapidly. I don’t know any browser settings which could make the gifs not run or run slowly. Also, while another in-browser photo editor could be used to collage the blingee, it might not be as fun or offer the same stickers, potentially excluding students. I do not have a concrete solution to accommodate this.
-
Students with physical disabilities might find it difficult to maneuver a computer mouse/ handheld. From what I understand, disabled students are provided technological accommodations at the general school level (e.g. a special kind of mouse) so the latter is not an issue. However, if motor skills are a roadblock at the computer, using a tablet may assist with ease of use.
-
I anticipate that not every student will have the same level of technological competency and experience with whatever photo-editing software. Certain students may want to have instructions/demos they can access if they have any questions or can follow along with at a pace separate from the class. Therefore, I would make some videos where I screen-record a demo.
Make a Coded Thing
When following the demo from p5.js's website, I created this coded "sketch" that's transformative because of its ability to be changed by the input of the mouse.
Below, you can access the details of the lesson plan designed paralell to this coded project.
What are the most important skills students will need to learn for this lesson? In what order could you scaffold them?
This assignment is one where students follow along with p5.js’s “Get Started” step by step demo. Therefore, the module is instructing students in the specifics. However, the instructor can introduce students to coding as a group before they follow the module on their own and create their own work.
The basic idea that writing code causes an effect in the output, whether a “sketch” or website or game, is the skill upon which the other skills relating to programming for this assignment are based. To visualize, and therefore scaffold this, the p5.js web editor is used. As with the demo, the students or instructor begin with the code and change an element. For example, the teacher asks the class for a color that could be used and changes the color of an element per that suggestion. Then, the class observes how changing the code via text changes the visual output of the code, in this case a p5.js sketch.
Understanding the basics of programming language is another main skill for this assignment. While p5.js teaches specifics, the teacher can begin by showing how code looks and what the different colors correlate to. For example, how code looks line by line, and how to put values determining values inside the parentheses.
What considerations would you need to make for materials (IRL or Digital)?
Students should be equipped with a device with a browser that’s able to open up the p5.js website and web editor. Students use one tab to access the demo, and another with the web editor on it.
What grade level(s) or age range could this project be appropriate for?
The p5.js language is kid-friendly in that it is simple and provides instruction to follow along with. However, due to the amount of reading, I would relegate this project to older elementary school ages (i.e, fourth or fifth grade); they would be able to follow along and make use of the skills p5.js teaches and the foundational coding skills it provides. Students in high school might breeze through this assignment or benefit from more freedom.
How would you adjust the theme/big idea for the age range chosen?
I believe the concept of cause and effect at the heart of this project is very applicable to the simple coding students at this level are engaging in. Students use the web editor to make edits to their code and observe the effects that creates.
Brainstorm a few accommodations for students with special needs ( e.g. physical disabilities, english language learners, social emotional behavioral issues)
Students with physical disabilities should be offered tools that allow them to have mobility to control the screen, mouse, and keyboard with ease. For those with vision issues, a screen reader should be provided.
Additionally, students who struggle with patience, reading, social, emotional, or behavioral issues might find it difficult to follow along one to one with the demo. In this case, it might be beneficial for the instructor to provide some pre-written code with comments in it indicating where edits could be made to change the appearance of the sketch. From this point, the student could edit the code at their leisure to observe the effects.
New Media Artists Presentation
For my midterm, I investigated the new media technique of fax art. In this presentation, which I gave to the class, assisted by the above visual art, I elaborate on three artists using the technique of fax art differently. As I explain about this art form + relevant techniques, I additionally compare + contrast these artists, their themes, and their work.
Final Lesson/Unit Plan
This lesson plan, which was my final, fully-developped LP, is an edited and refined version of the one I developed previously.
Big idea:
Inspiration. Inspiration is a universal human idea, and by reflecting and arranging pieces of art that inspire them, students will learn to connect thematic ideas and explore deeper meanings of art they enjoy.
-
Key concepts: Collage, remixing, interests, conceptual themes.
-
Essential quesions: What media do we find meaningful? How can we take inspiration in a new way? Why do we source references in our projects?
Content statement:
Students will use textual evidence supplemented by found images within the same theme as inspiration to write and make a statement about something they find meaningful. The finished project will be a miniature (8 page) digital zine that combines the student's references in an innovative and personal manner.
Rationale:
Being able to conceptualize overarching themes in language and art is an important skill for literacy. By allowing students to connect themes to media or interests they enjoy students are granted agency and gain efficacy in their ideas and beliefs.
Creative examples:
Not only does Richmond Public Libraries host Richmond Zine Fest anually in October, but the library has a Zine Collection too! Other local physical zine libraries for the class to visit include Studio Two Three's Richmond Independent Zine Library, the VMFA's Zine Collection, and VCU Library's Special Collections and Archive. Because zines are great physical objects, I would encourage the class to visit these creative examples in person. One local zine available online is punk publication ThroTTle Magazine, which ran in the 1980s until 1999.
Alternatively, there are some great digital zine arcives spanning many localities across the globe. They can be so fun to explore, though may not be appropriate for readers of all ages. Therefore, I reccomend educators use these websites to find zines that work for their classroom. Some of these zine archive sites include the Internet Archive, Queer Zine Archive Project, and the Public Zine Library on LibraryThing.com.
Of the zines I reccomend and link to here, I have done my best to vet these for appropriate content, given that some zines center adult subject matter like sex, or topics which would merit discussion like politics. The examples below are zines that either have some sort of creative collage/ "webweaving" element or whose topic is something the author is passionate about.
- "it's easier than you think" by sophie mautner (2022). Available on Archive.org.
- "NEKOZINE 2025" by many creators (2025). Available on zine.nekoweb.org.
- "Skating with Shes and Hers #1" by Amelia Bjesse-Puffin (2017). Available on Wordpress.com and Librarything.com.
Time required:
If class periods are about one hour long each, the unit should consist of four to five lessons. At maximum, six. Students are encouraged to work outside of class, especially during the planning and working periods.
Objectives and assessments:
Many of these sections are expanded upon in the Important skills and their scaffolding section.
Unit objectives include
- Students can relate what inspires them to a general idea
- Students can distinguish media elements with a common theme or concept
- Students can create a plan to demonstrate their thinking
- Students can compose and arrange media elements to create new meaning
- Students can evaluate their communication and others as it pertains to their idea
1. Familiarizing
- Snapshot of the Day: Students will learn what a zine is and begin ideating on what inspires them.
- Objective(s):
- Students can define what a zine is and describe a zine that interests them
- Students can give examples of media, visuals, and textual elements that inspire them
- Students can analyze overarching concepts and themes within a list of inspirational elements they generate themselves
- Assessment: The formative for this unit/lesson is to be completed before the start of next class, as some students might appreciate more time outside of class to gather sources, however it should be begun by the second half of class. Students will assemble a list of elements they wish to collage in their zine. These could include art, photos, lyrics, text, emojis, symbols diagrams, and more! A student meeting this standard would have relevant thematic connections between their elements, specific examples, and be able to cite their inspirations.
2. Planning
- Snapshot of the Day: Students will be introduced to both the planning sheet to help organize their thoughts and the digital image editing program they will use. Midway through class, I will act through both instructions and follow-along demos on the digital program we are creating our zines with by screensharing.
- Objective(s):
- Students can identify how to accomplish artistic tasks and achieve visual outputs in their digital image editing program
- Students can propose thematic connections between selected elements
- Students can plan, design, and arrange elements to create meaning
- Assessment: Students, by the start of next class, should have used the zine planning sheet to the best of their ability to determine what images, text, etc they will arrange in their zine. Additionally, sketching out one's ideas in a sketchbook is encouraged (especially if the student's idea does not include much text). A satisfactory completion of this assessment is determined by how involved the student is arranging their elements, as opposed to listing them.
3. Developing
- Snapshot of the Day: Students will be provided with a series of demos and instructions for the digital editing program if they would like to re-familiarize themselves. During class, students will refer to the plan they created as they arrange their selected elements. This may be two class periods and students are encouraged to work outside of class.
- Objective(s):
- Students can demonstrate their knowledge of using digital image editor tools to create effects they desire
- Students can compose visual and textual elements on a page to communicate intention or meaning
- Assessment: The students' knowledge of the digital program and their own ideas should be measured by whether the zine is in progress yet (not to what degree it is finished) and how fleshed out their expectations are for the rest of the zine.
4. Presentation
- Snapshot of the Day: Using what they've learned so far, students will continue their work and finish making the zine. If time is an issue, working on the zine should be more than two class periods to allow time (at least 30 minutes) for critique.
- Objective(s):
- Students can explain production choices and inspirations they took during their creation process
- Students work can communicate their meaning using visual and/or textual elements and possess an overarching theme/concept
- Students can identify the creative choices of others
- Assessment: Both the zine each student produced themselves and their presentation of it will be graded as summatives. For the latter, students will create a video of them reading their zine with some commentary so the instructor may ascertain how developed the student's thematic connections and use of collage is. However, students are expected to read and share their zines in small critique groups as well, and engage with the creative projects their classmates have produced.
Important skills and their scaffolding:
-
Familiarization with media, medium, and product.
-
What is a zine? (The product). I would not assume every student knows what a zine is, so I would use a short period of time to review some examples of indie zines and encourage students to find zines that interest them and appeal to subjects they find meaningful.
-
Using digital photo-editing software (the medium) to collage is also something that is new to many students; students may have familiarity with physical collage, and perhaps even some application of digital design because of Canva, Instagram, and Google Slides. However, I would not assume complete digital competency [read: I expand on this idea more fully in the accommodations section] and therefore would scaffold the introduction of the photo editing software using short demos (on the most necessary aspects of the software, i.e. file creation, saving, layers, and importing media) I screen-share before work time and follow-along-during-work-time demos. While students are working I would go around and assist if there are any technical difficulties.
-
Synthesis of found images, one’s own writing, and found text (the media) is a major part of this project and thus I would not attempt it unless I was confident in students’ ability to seek out materials. This could be scaffolded by having an earlier, physical collage assignment, like a vision board. When introducing this assignment, after introducing what the finished product would look like, the class would (independently & collaboratively) find and contribute images of significance to them or are important to their idea. We did a version of this in our own ARTE250 class where we searched for images on the pdimagearchive.org site.
-
-
Developing an idea. Not every student’s thought process will look the same. I understand that some students plan things methodically, some use a visual sketchbook, and other plans will be fully written; it is a spectrum. Because this project is geared towards the high school level, I would assume that students know that to explain their thoughts they use evidence. Planning includes applying & organizing textual evidence, one’s own writing and imagery and is linked to developing an idea. To add structure for the visual part of this I would introduce a table in the planning stage similar to one I used myself, with separate columns for “Concept”, “My textual analysis”, “Textual evidence”, “Imagery”, and page number. It is not necessary to use this table. However, to facilitate deeper thought and check-in that they are connecting with an idea that is meaningful to them, I would meet shortly with students to see what their ideas are after they have shared in mini-groups with their peers.
-
Not every student feels confident enough to put forward their own ideas. Some themes that may be relevant to many students can be provided as an “inspirational list”, if they choose to seek them out. For example: beauty standards; music & subculture; culture & identity; history & social justice movements; friendship & peer relationships; family; social media; sports teams; personal hobbies; and stories. If a student has a favorite TV show, musician, or thing that they’re a fan of, creating a “fanzine” might be meaningful. Providing zines across a variety of subject matter is relevant to scaffolding the idea that students can produce art that is meaningful (to themselves, and others).
-
-
Aspects of digital collage. A demo at the beginning of the lesson facilitates the introduction of digital collage techniques and concepts of the software program.
-
Layers & clipping masks. I would say this is the main visual idea or collaging stuff together. Why are parts of the image in/visible or hidden? How can shapes and clipping masks be used to make cut-outs from images? Technical competency with the concept of layers and the effect should be scaffolded in the first demo run by the teacher and involve student participation and following-along.
-
Transform tool. This is the second pillar of digital-zinemaking. How are images and text enlarged or shrunk? How can we position things on the page? Why can certain things be too large or small to be effective visually? How can the flip, rotate, and warp tools change the look of an image?
-
Color editing & effects. There are endless possibilities when it comes to making images look different. Teachers should go over basic editing options and procedures (e.g. a color filter, pixellated effect) but students might have their own ideas of what they want to attempt and should thus explore the tools of the program themselves, look up tutorials, and ask for peer or teacher help. As expanded upon in the accommodations section, teachers should compile videos, tutorials, and demos for students to review if/when they would like. Just make sure students are appraised of the save and undo buttons so they do not lose progress and/or feel frustrated!
-
Composition. Because a zine is about pages and will be read, students should be able to identify design principles informing the experience of the reader. For example, what part of the page is seen first? The center, the top? Where do our eyes go when reading a zine? Where should the most detail be located?
-
Considerations for materials:
-
Computer or device with Photopea, Photoshop, IbisPaintX, Paint [any photo editing software with features useful for collage, i.e. text, pasting and transforming photos]
-
Sources for images that are vetted and appropriate: pdimagearchive.org, Unsplash, students pre-existing camera roll or assignments, scanned magazines/other physical media, or from a common class drive
-
Non/technological ability to produce and edit text, for example with the Notepad app or Google Docs
-
The planning stage might include physical media like a sketchbook, but also magazines or books to scan and use as media
Target student group:
-
High school students, given the (possible) multi-day long research/planning as well as more formal collage styles. Specifically, grade 10, because these students are exposed to short essay writing (this is kind of a visual essay, or can be…) but not saturated with the subject. Also, I imagine a writing-heavy project could be boring for many students, and thus I emphasize, it doesn’t have to include much writing. Text can be anything [read: okay not anything, it must be school appropriate], or not be present.
-
However, because students are creating by synthesizing, as opposed to making something new, I would not recommend this for a final project.
Adjusting themes/big ideas for different age ranges:
-
If I were to attempt this project at lower grade levels, I would begin with a physical media component for the collage as to not overwhelm them with an entirely new medium (photo editing using tech) and encourage more poetic, simple, non-analytical type text produced by the students in order for the students to express themselves.
-
This project could also entail interdisciplinary collaboration; in my case I touched on literary analysis, psychology, art history, and (technically) computers. If time constraints and student age dictate that class time not be spent in the “thinking” or “planning”, it might be beneficial for students to repurpose writing they’ve produced in other classes.
-
The general theme at the high school level is using “textual evidence supplemented by found images to write and make a point about something you find meaningful”. Because I still want meaning to be a central idea, but think it should be less formalized for younger students, I would reissue the big idea to be more along the lines of “What means a lot to you? It can be an experience, idea, people, a place, or anything. Use found photos (NOT composed) and text to express how.”
Accommodations:
-
Large amounts of text might not be suitable for ESL students, those with dyslexia, or students with learning disabilities. Therefore, text is not intended to be a major part of the project; using it is a choice of the artist. The main idea should still be understanding and collaging various kinds of information and communicating one's own ideas; it is possible to do this using non-textual means. I encourage students to think about what they want to say and how they would like to do so.
-
Students with physical disabilities might find it difficult to use certain handheld materials (e.g. scissors and razor blades to cut magazines) or maneuver a computer mouse/ handheld. From what I understand, disabled students are provided technological accommodations at the general school level (e.g. a special kind of mouse) so the latter is not an issue. Additionally, the former is not expected in this project. But it might be easier for students with a tool like a guillotine trimmer or special scissors. However, if motor skills are a roadblock at the computer, using a tablet may assist with ease of use.
-
I anticipate that not every student will have the same level of technological competency and experience with whatever photo-editing software. Certain students may want to slow down with the instructions/demos or refer back to them during their process. I would plan to begin the class(es) with an in-person demonstration/follow-along of the photo-editing software features and general means of using it, but also record videos of this demo as well as specific common questions to avoid frustration. Because this is a very self-directed/individual project, I believe students could, if undergoing asynchronous learning, for example, set their own pace when making their mini-digi-zine and refer back to the videos or office hours if they ran into any questions. Also, this would mean students very invested in their vision would be able to dedicate more time to the project.
SOLs:
- AII.1 The student will apply creative thinking to original artistic works.
a) Select materials, media, and processes of personal interest to communicate ideas in artworks.
- AII.2 The student will apply a creative process to develop ideas and artwork.
b) Expand the use of a digital or traditional process art portfolio to include research, inquiry, preliminary sketches, completed works, critical writings, and reflections.
- AII.12 The student will employ elements of art and principles of design to effectively communicate intended meaning in works of art and design
References
Many of the sources I looked at for my project were geared towards educators. They include: